Localizing applications
Localization involves the creation and use of different resources, such as, text, textures, and styles, for locales that you want to support in your application. Kanzi uses localized resources indirectly using resource IDs that hold a separate value for each locale. To keep track of localized resources and locales Kanzi uses localization tables. You can see all localized resources and locales used by your application in the localization tables in the Library > Localization.
To localize your Kanzi application:
- Create a localization table and add the resources used in your project you want to localize to the localization table. See Adding resources to a localization table.
- Localize resources. See Localizing text resources and Localizing other resources.
- Edit localized resources. See Editing localized resources.
Learn how to localize your Kanzi applications by completing the localization tutorial. See Tutorial: Localize your application.
Adding resources to a localization table
If you have a complete Kanzi application you want to localize, or if you added content to a Kanzi application that you already localized, you have to create the resource IDs for the items you want to localize and add them to a localization table. After you create the resource IDs for the resources you want to localize and add them to a localization table you can start localizing your Kanzi application. See Localizing text resources and Localizing other resources.
To create resource IDs and add them to a localization table:
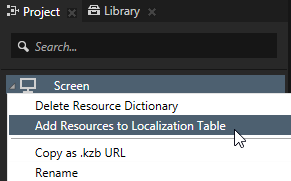
- In the Project right-click the Screen node and in the context menu select Add Resources to Localization Table.
When you use the Add Resources to Localization Table command on the Screen node, Kanzi Studio enables you to add all resources in your project. To include resources only for the selected node and its tree, right-click that node and select Add Resources to Localization Table.
- In the Add Resources to Localization Table window set:
- Localization Table to the localization table to which you want to add the resources. If you do not have a localization table yet, select <Create localization table ...>.
Localization table contains the information about which locale uses which resources. - Select the resource type you want to show in the Add Resources to Localization Table window.
For example, to show only text and image resources select  and
and  .
.

- In the table that lists all resources of the type you selected, click the checkbox next to the resource you want to add to the localization table you selected. To change the resource ID, double-click the resource ID and enter a new name.
If you want Kanzi Studio to automatically generate unique resource IDs for the resource with duplicate or missing resource IDs, click Generate Keys. - Click Add.
Kanzi Studio creates resources and resource IDs from all resource types you selected and adds them to the localization table you selected. You can find the localization tables in the Library > Localization. You can now localize resources and in the localization table set which resource you want to use for which locale.
- You can start localizing your Kanzi application. See Localizing text resources, Localizing other resources, and Editing localized resources.
Localizing text resources
Kanzi uses gettext's .po file format for handling localized text resources. See The Format of PO Files. To use a different format for importing and exporting localized text resources, you can use the Kanzi Localization Plugin API to create a Kanzi Studio plugin that supports the format based on your specifications. You can find an example of such plugin in the <KanziWorkspace>/Examples/CsvPlugin directory. See Csv plugin example.
To localize text resources:
- Create text content in your Kanzi Studio project using Text Block nodes and add text resources to a localization table. See Adding resources to a localization table.
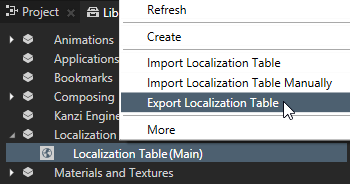
- In Library > Localization right-click the localization table that contains the resources you want to localize, and select Export Localization Table. Kanzi Studio exports to <ProjectName>/Localization/<LocalizationTableName> the localization table template to a .pot file, and as many .po files as you have locales in that localization table.
- (Optional) If you want to export all localization tables in your project, right-click Library > Localization and select Export All Localization Tables. Kanzi Studio exports to <ProjectName>/Localization/<LocalizationTableName> one localization table .pot template file for each localization table, and as many .po files as you have locales in all localization tables.
- This step depends on whether you are translating your Kanzi application for the first time or whether you are doing an incremental translation:
- If you are translating your Kanzi application for the first time, send the .pot file to your translators. The translators create one .po file for each locale.
- If you are doing an incremental translation, send only the .po files for each locale to the translators for that locale.
- After you receive the .po files from the translators, save them to <ProjectName>/Localization/<LocalizationTableName>.
- In Kanzi Studio in the Library > Localization right-click the localization table the content of which your translators localized, and select Import Localization Table. Kanzi Studio imports all .po files in the <ProjectName>/Localization/<LocalizationTableName> directory to the selected localization table.
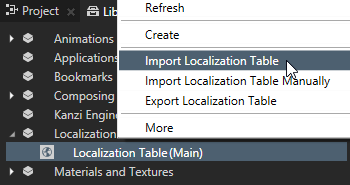
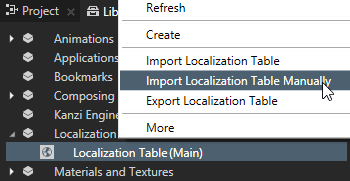
- (Optional) If you want to manually select the location from which you want to import the .po files for your project, select Import Localization Table Manually.
- (Optional) If you want to import .po files for all localization tables in your project, in the Library right-click Localization and select Import All Localization Tables. Kanzi Studio imports all .po files in all directories found in <ProjectName>/Localization.
Localizing other resources
Besides translating the text content into multiple languages, Kanzi enables you to use different resources for each locale, including animations, brushes, composers, fonts, materials, meshes, textures, and styles. You can use this procedure to localize resources of all types.
To localize other resources:
- Create or import content to your Kanzi Studio project and add the resources used by this content to a localization table. See Adding resources to a localization table.
For example, if you have five locales and want to use a different set of textures for each locale, import to your Kanzi Studio project the images for the textures for each locale. See Importing.
- In the Library > Localization double-click the localization table that contains the resources you want to localize.
Kanzi Studio opens the localization table in the Localization Editor.
- In the Localization Editor find the resource you want to localize, double-click the resource cell in the locale into which you want to localize, and enter the text or select the resource ID for the resource you want to use for that locale.
If you do not select a resource or value for a locale, Kanzi uses the default resource or value for that locale. The default value is listed in the Default Value column.
- Repeat the previous step until you select resources for all resources and locales.
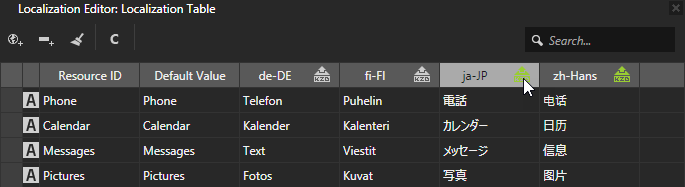
Editing localized resources
You can set and edit the resources that locales use using the Localization Editor.
To edit the localized resources:
- In the Library > Localization double-click the localization table that contains the resources you want to edit.
Kanzi Studio opens the localization table in the Localization Editor.
- Use the Localization Editor:
- To edit values used by locales, double-click the cell for the resource and set the value used by each locale.
- If you do not select a resource or value for a locale, Kanzi uses the default resource or value for that locale. The default value is listed in the Default Value column.
- To use an empty string for a text resource, enter a value, delete the value, and then press Enter.
In the Localization Editor cells that contain empty strings are gray.
- To add a locale click
 , select the locale from the drop-down list, and click OK.
 - To add a resource to a localization table manually, click
 and select:
- Create New and select a resource type to create a new resource.
- Add Existing and select a resource that already exists in your project.
- To delete resource IDs from a localization table that are not used in the project, click
 , select the resource IDs you want to delete and click OK.
 - To delete a resource ID from a localization table, right-click the resource ID and select Delete Resource ID.
- To convert a text resource to any other resource type, and the other way around, right-click the row header of the resource you want to convert and select either Convert to Resource, or Convert to Text.
Note that you can convert the resource type only for resources that are not already in use.
Creating locale packs
A locale pack is a .kzb file that contains only the resources of a specific locale. Using Kanzi Engine API you can load the application resources used by a certain locale only when you need them, and unload the resources that the application does not need. That way only the resources used by the current locale occupy the device memory.
When you want to export a resource that is used by a locale pack to the main project .kzb, in the Library select the resource and in the Properties add and enable the Is Used By Code property. All resources that have Is Used By Code property enabled are exported only to the main project .kzb file and not to any locale packs that use them.
To create a locale pack:
- In the Library > Localization add to the localization tables the resources used by the locale you want to add to your Kanzi application in a locale pack.
- In the Library > Localization double-click any localization table and in the Localization Editor click
 next to the locale name the resources of which you want to export in a locale pack.
-
In Kanzi Studio select > Export KZB > Export Locale KZBs. This command:
- Creates one .kzb file for each locale you marked in the localization table as a locale pack. When Kanzi Studio exports locale packs it names the .kzb files after the locale the resources of which they contain. Each locale pack file contains only the resources used by that locale.
- Creates the main .kzb file that contains the entire Kanzi Studio project, except the resources of locales you mark as locale packs in the localization table.
- Stores the locale pack .kzb files in the <ProjectName>/Application/bin/Locale_packs, <ProjectName>/Binary/Locale_packs directory, or the Locale_packs directory in the location you specify in the Binary Export Directory property in the > .

Tip If you want to export the entire Kanzi Studio project to a single .kzb file, including the resources of locales you mark as locale packs, select > Export KZB > Export KZB Binary.
- Use the Kanzi Engine API to load the locale pack in your Kanzi application. See Tutorial: Localize your application.
Showing resource use
In the Localization Editor you can see in the currently selected context in the Project whether resources are used and where they are used.
To show resource use:
- In the Library > Localization double-click the localization table where you want to inspect the use of resources.
Kanzi Studio opens the localization table in the Localization Editor.
- Use the Localization Editor:
- To show in the localization table only the resources in the currently selected context in the Project, click
 .
. - To list the nodes that use a resource, right-click the resource ID and select Show Usage.
Creating localization tables
Kanzi uses localized resources indirectly using resource IDs that hold a separate value for each locale. To keep track of localized resources and locales Kanzi uses localization tables. You can see all localized resources and locales used by your application in the localization tables in the Library > Localization.
You can create several localization tables to:
- Keep the resource types separated. This makes the application development of a large project easier.
- Separate resources based on the parts of your application. When several application developers work on the same application, each can have a localization table for their own area of the application.
- Enable you to send the content from different parts of the application to translators.
To create a localization table, in the Librarypress Alt and right-click Localization, and select Localization Table.
See also
Using locales
Tutorial: Localize your application
Localization

Open topic with navigation